


Education & Teaching
Greg P. Smestad, Ph.D. served as an Adjunct Lecturer at Santa Clara University from the Fall Quarter of 2013 through the Winter Quarter of 2016. He taught Distributed and Renewable Energy for the Developing World in the graduate program of the School of Engineering. From 1995 to 2002, he was a professor, first as the founding lecture and lab chemist at the California State University, Monterey Bay, and then as a part time science-policy specialist at the Monterey Institute of International Studies (MIIS). His teaching experience is varied and diverse.
Dr. Smestad’s more than 25 years of experience in the fields of semiconductor materials, solar cells, optics, optoelectronics, and renewable energy is key to the successful application of his skills towards industry, practical applications, and education. His background and skills may be perfect for your needs in Technical Training and Due Diligence.
It has become apparent that researchers and entrepreneurs need to understand and utilize a view of solar cells and solar conversion systems that stems from a fundamental perspective. To that end, Dr. Greg Smestad published a tutorial text that covers the optoelectronics, materials science, economics and thermodynamics of solar cells. He has also published many papers on potentially low-cost approaches to solar conversion, as well as a policy papers and studies. Here is a sampling of our projects related to education –
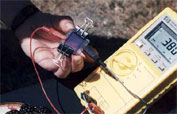
Understanding Solyndra’s Array of Cylinders
From a theoretical and experimental standpoint, Sol Ideas has examined the technical aspects of the cylindrical absorber arrays used by Solyndra. Work from mid-1970s used optics and solar geometry to understand the energy collected by evacuated tube solar collectors. The results are applicable even when the cylinders are photovoltaic. Educators and scientists can use this study to teach basic principles solar radiation availability and solar collection geometry. This work has been published and presented.
R. J. Koshel, G. P. Smestad, D.l Shull, P. Stephens, and T. Healy, “Cylindrical and Flat Solar Collector Geometries: Theory and Experiment – The Performance and Optics of the ‘Solyndra’ PV Panel,” presented Nov. 13, 2012 at Optical Society of America (OSA) Meeting, SOLAR 2012, Eindhoven, The Netherlands. Download OSA Presentation
Technical Training
Companies and research institutes can consult with Dr. Smestad to conduct training and tutorials in our areas of expertise. These include materials science and optics related to photovoltaics, solar cells, and optoelectronics. Sol Ideas can tailor any course to serve your organization’s needs. Learn more about our technical training services.
Optoelectronics of Solar Cells
A tutorial text on solar cells has been published that approaches the topic from an optical and thermodynamic perspective. It presents a generalized model of a solar converter, and the Detailed Balance description from the Generalized Planck Equation. This leads logically to the relationship between a solar cell’s voltage and the Luminescence efficiency of the absorber material. The book also outlines the thermodynamic limits of light Concentrators, and the basic economics of photovoltaic cells and systems.
Solar Cell Kit
We have developed solar cell kits used for instructional purposes in universities and classrooms. The “Nanocrystalline Solar Cell Kit: Re-creating Photosynthesis” is a teaching tool which uses natural dyes extracted from berries, and non-toxic materials to create a solar cell that lasts only a few months, but can teach students about sustainable energy production.
G. P. Smestad, “Education and solar conversion: Demonstrating electron transfer,” Solar Energy Materials and Solar Cells, 55, 157, 1998. Download Article
Juan Bautista de Anza Trail Guide and Audio CD Project
In keeping with his interest in education and public service, Sol Ideas founder Greg P. Smestad, Ph.D. has developed a trail guide for the Juan Bautista National Historic Trail. This project was carried out in conjunction with the National Park Service and Los Californianos and resulted in both a printed version (Antepasados, Volume XI) and an on-line version. Music and sounds were a unique aspect of this project.